 a journal of interesting technical ideas . . . a journal of interesting technical ideas . . .
This is a long post, but most of it is file contents. Keep reading!
GNS3 appliance files are descriptions of virtual machines used in network simulations. The appliance files have suffixes of .gns3a and are included with the GNS3 download. You can update the files and create new ones. The goal of this article is to walk through the process of working with appliance files and contributing them back to the community.
On a personal note, submitting a new GNS3 appliance was the first time I contributed to an open-source project. I’m still learning, but a few years ago I knew nothing. Jeremy Grossman, with GNS3, was patient and helped me understand the process of using Git. Contributing - even in this minor way - was a real high for me and I’d love for you to be able to share that feeling and contribute to this and other projects. GNS3a was my “gateway drug” into being a contributor and not just a consumer of open source.
One of the files I’ve contributed is the Security Onion appliance. Security Onion is a Linux distribution that focuses on security tools. Below is the current version (9/1/20) of the GNS3A file. Before we create a new appliance, let’s update this one.
It was using around 15–20% CPU and about 200 MB of RAM. The name looks like a mashup of "Qt Open Source Windows x86 5152 exe" plus the word "top" at the end. That immediately raised some red flags for me.
When you run qtopensourcewindowsx865152exe, the setup process is straightforward, but there are a few configurations you should keep in mind to ensure a smooth development experience.
That is the genuine qt-open-source-windows-x86-64-5.15.2 .
: Historically signified 32-bit architecture, but in the context of this unified installer, it acts as a host installer wrapper that can deploy both 32-bit (x86) and 64-bit (x64) build tools (like MinGW and MSVC compilers). 5.15.2 : The exact version of Qt.
The file name breaks down into critical technical definitions:
This looks like it could be a renamed Qt binary (maybe a legit Qt app compiled poorly?), but the random-looking number 5152 and the extra top argument feel off. Possibly a malware dropper or a coinminer wrapped in a Qt launcher?
This specific executable is the for Qt 5.15.2 on Windows. It contains everything a developer needs to build cross-platform desktop and embedded applications: Qt Core/Gui/Widgets/Network (Essential libraries) Qt Creator IDE (The IDE often bundled with it) MinGW 32-bit & 64-bit compilers Qt Quick/QML
For further information on Qt, please visit the official Qt website: https://www.qt.io/
C:\Qt\5.15.2\mingw81_64\bin\qmake.exe C:\Qt\5.15.2\msvc2019_64\bin\qmake.exe
If you find a site offering a direct download of a 5.15.2 offline
First, select the components carefully. The installer usually includes multiple versions of the compiler, such as MinGW and various MSVC (Microsoft Visual C++) versions. Ensure you select the compiler that matches your project requirements. For most Windows desktop apps, the MSVC 2019 32-bit or 64-bit components are standard.
If you have the .exe file, follow these steps to set up your development environment:
Most of this is pretty straight forward. The structure looks like:
A descriptive section
Next is the Qemu section that describes how the VM environment should be constructed. This is straightforward as well. Console types are VNC or telnet. You may have to try different ethernet adapters to see what works, but I recommend starting with the Intel e1000 because this model is supported by most VMs. Using a para-virtualized adapter may give better performance, so you may also want to try vmxnet3. Most architectures will be 64bit and RAM requirements will usually be on the website.
That leaves two sections - Images and Versions. There should be a matching entry in both places. The images section is a list of virtual hard drives and CD-ROM images to use in the VM and includes:
Let’s update this file. There are a lot of old images listed as options. I’ll remove the image and version sections for 14.04.5.3 and add the most recent (16.04.7.1). That will leave users with the last 14.x and two images in 16.x including the latest. Whether dealing with a distribution or a commercial image, changes made between versions may introduce new processes or bugs so leaving some older images gives users an easy workaround. Here’s the updated file. Scroll below the output for a discussion of submitting this back to the project.
It was using around 15–20% CPU and about 200 MB of RAM. The name looks like a mashup of "Qt Open Source Windows x86 5152 exe" plus the word "top" at the end. That immediately raised some red flags for me.
When you run qtopensourcewindowsx865152exe, the setup process is straightforward, but there are a few configurations you should keep in mind to ensure a smooth development experience.
That is the genuine qt-open-source-windows-x86-64-5.15.2 .
: Historically signified 32-bit architecture, but in the context of this unified installer, it acts as a host installer wrapper that can deploy both 32-bit (x86) and 64-bit (x64) build tools (like MinGW and MSVC compilers). 5.15.2 : The exact version of Qt. qtopensourcewindowsx865152exe top
The file name breaks down into critical technical definitions:
This looks like it could be a renamed Qt binary (maybe a legit Qt app compiled poorly?), but the random-looking number 5152 and the extra top argument feel off. Possibly a malware dropper or a coinminer wrapped in a Qt launcher?
This specific executable is the for Qt 5.15.2 on Windows. It contains everything a developer needs to build cross-platform desktop and embedded applications: Qt Core/Gui/Widgets/Network (Essential libraries) Qt Creator IDE (The IDE often bundled with it) MinGW 32-bit & 64-bit compilers Qt Quick/QML It was using around 15–20% CPU and about 200 MB of RAM
For further information on Qt, please visit the official Qt website: https://www.qt.io/
C:\Qt\5.15.2\mingw81_64\bin\qmake.exe C:\Qt\5.15.2\msvc2019_64\bin\qmake.exe
If you find a site offering a direct download of a 5.15.2 offline When you run qtopensourcewindowsx865152exe
First, select the components carefully. The installer usually includes multiple versions of the compiler, such as MinGW and various MSVC (Microsoft Visual C++) versions. Ensure you select the compiler that matches your project requirements. For most Windows desktop apps, the MSVC 2019 32-bit or 64-bit components are standard.
If you have the .exe file, follow these steps to set up your development environment:
In GNS3, go to File > Import Appliance and make sure that your appliance imports correctly. GNS3 will provide guidance if there’s a formatting error. Looking at the JSON above, you can imagine that a common mistake is unmatched brackets!
If the GNS3a file loads, test it by creating an instance. You need to test at least any new versions you added. Make sure the appliance boots without error and that expected interfaces are available.
Once the pieces are working, submit the appliance to the community by cloning the GNS3-registry on Github and adding in your file.
git clone https://github.com/GNS3/gns3-registry.git
If you’ve already cloned it, make sure that your branch is up to date. Upstream is the original source (in this case the GNS3 copy).
git fetch upstream
Two Python programs are included in the repo. Run them both on your copy before continuing. These are QA processes that look for issues before you submit. They will take a little time to run.
pip3 install -r requirements.txt   # this does __pip3 install jsonschma__ and __pip3 install pycurl__
python3 check.py
python3 check_url.py
Next push your local copy to your github copy. In Github terms, origin is your copy on Github, and master is the local copy.
git add .
git commit -m "Updated Security Onion"
git push -f origin master
Now we have an up to date local copy of the gns3-registry that includes our updated gns3a appliance and we’ve updated our fork on Github. Next, we offer our update to the project via a Pull Request. You are going to be one of the cool kids!
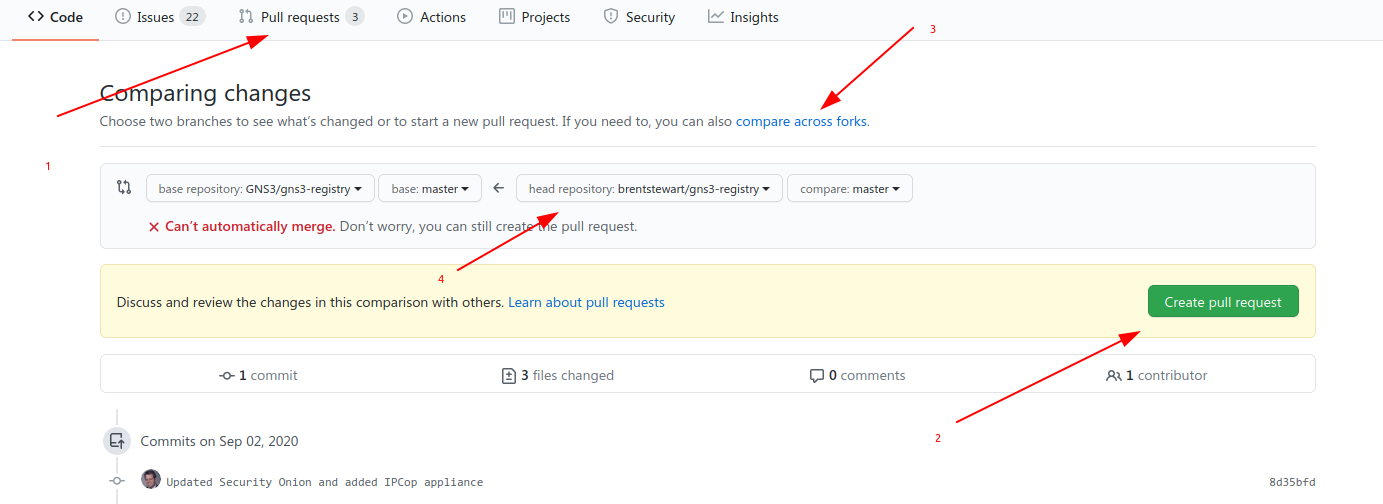 Go to the gns3-registry repository on Github and select the Pull Requests tab and click the big green New pull request button. Under Compare, select the link to compare across forks (since your copy is a fork) and select your fork. It should show you the changes to files so take a moment to digest that and make sure this PR is doing what you want. Finally, submit the Pull Request. Github will email you when there’s an update to the request. If the GNS3 team has a question, they’ll submit a comment on the PR and leave it open for you to resolve. Otherwise, it will get merged in and all the other GNS3 users will be able to enjoy your hard work!
Thanks!